Page Under Construction
Pattern is complete
Photos Coming Soon
Size: about 6 inches in diameter
This little pocket purse was designed only to hold small toys or treasures.
If it is to be used to carry monies, small change etc,
I suggest a simple lining be inserted.
Materials
Written in U.S. crochet terms
Size I 9 - 5.50 Susan Bates Crochet Hook
Small hook (if making heart nose) size F
large yarn needle
Red Heart Super Saver - Color of choice (Less than 4 ounces)
Small amounts of black for eyes and whiskers
color of choice for nose, handle and bow
White button if desired
NOTE: Leave long tails on all pieces for sewing.
Video tutorial for how to make a “magic circle” can be found here”
Body of purse: can be worked in joined rounds or as a spiral. If you make it as a spiral, you can avoid the telltale joining line but it will not be perfectly round. However when finished I have found the slight difference is not obvious.
To work in rounds:
Back:
Work face up do not turn.
Start with magic circle, ch 3, 11 dc in circle, (join all rounds with sl st,)
Rnd 1: Ch 2, dc in joining (*2 dc in each st) around. (24 dc)
Rnd 2: Ch 2 dc in joining (*1 dc in next st, 2 dc in next st,*) around (36 dc)
Rnd 3: Ch 2 dc in joining (*1 dc each next 2 sts, 2 dc in next st,) around (48 dc
Rnd 4: Ch 2 dc in joining (*1 dc in each of next 3 sts, 2 dc in next st) around, (56 sts)
leave last 15 stitches unworked.
Front
Rnds 1 - 3 Work same as Back.
Rnd: 4 Work same as back to last 15 sts., ch 2, sl st in same st, sl st in next 8 stitches, ch 10, sl st in same st, sl st in next 7 sts, join work in end. (Button loop complete)
To work body of purse as spiral:
Back:
Start with a magic circle,
(Sl st, 1 sc, 1 hd , 10 dc in circle,) place marker and move it up at end of each row, do not turn.
Rnd 1: work (*2 dc in each st ) around. (24 dc)
Rnd 2: work *(2 dc in next st, 1 dc in next st) around (36 dc)
Rnd 3: work *(2 dc in next st, 1 dc in each of next 2 sts,) around (48 sts)
Rnd 4: work *(1 dc each of next 3 sts, 2 dc in next st,) around, leave last 15 stitches unworked. (56 sts) End off.
It may look a bit off shape but it will all work out
Rnds 1 – 3: Work same as front up to last round
Rnd 4: Work same as front for 42 stitches, ch 2 sl st
in the 42nd st, sl st in next 8 stitches, ch 10, sl st in same st, sl st in next 7 sts, join, work in yarn end. (Button loop complete)
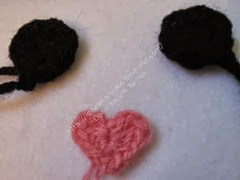
Noses (your choice style and color)
Round Nose
Start with a magic circle, 6 sc in circle. Join, end off.
Heart Nose Use F hook, Cut a 1 and 1/2 yard length of yarn. Separate 4 ply yarn to 2 ply. Start with magic circle, Sl st in ring chain 3, 3 dc, 3 hd, 4 sc, 3 hd, 3 dc, ch 3, sl st, all in ring. Pull yarn tail and draw ring tightly closed. Tie, Pull into heart shape
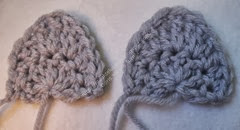
Ears (make 2)
Start with a magic circle, 6 dc in circle, join, ch 2, turn
1 dc in f irst st, 2 dc in next st, 3 triple crochet in next st, 2 dc in next st, 2 dc in last st,
End off
End off
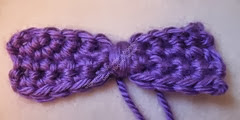
Simple Bow
Using color of choice, chain 11. Sc in 2nd chain f rom hook and each chain across. (10 sc)
ch 1, turn. Sc in each stitch across, ch 1, turn. Repeat till 4 rows are complete. End off.
Using a length of yarn in the same color, tightly wrap center of strip to form bow shape.
Using color of choice, chain 11. Sc in 2nd chain f rom hook and each chain across. (10 sc)
ch 1, turn. Sc in each stitch across, ch 1, turn. Repeat till 4 rows are complete. End off.
Using a length of yarn in the same color, tightly wrap center of strip to form bow shape.
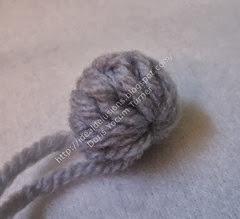
Crochet Bobble Button
Start with magic circle. Holding back last loops on hook, 10 dc in ring. Yarn over draw through all 10 loops on hook, ch 1. End of f . Draw up magic circle and tie ends together to f orm bobble type button. Sew to back section of purse.
WARNING:
For safety with young children, handle should be too short to fit over child's head
Handle Ideas: You can make a single or double handle.
Use a Knitting Spool, or crochet a standard " I " cord to create a 25 inch length to use as a shoulder strap. You might prefer to use a twisted cord or a braided cord if preferred or single crochet a length of flat braid about 4 or 5 stitches wide.
You could also chain the desired length, then working on back side of the chain, slip stitch in each little hump on the back of the chain, end off.
Assembly
Sew features in place before putting the front and back together.
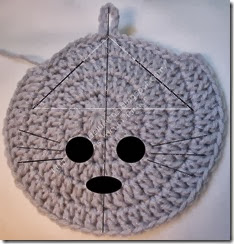
Please refer to diagram for placement:
Matching check points, (Red ) fold front of purse left to right to determine exact middle of purse. Working on the right side, counting the center as beginning row 1, stitch nose in 3rd row at center of front
Stitch eyes in 2nd row at center of purse, about 1 inch apart
Stitch kitty whiskers as desired.
Stitch ears in place (purple line on diagram)
Stitch bow in place as desired
Stitch eyes in 2nd row at center of purse, about 1 inch apart
Stitch kitty whiskers as desired.
Stitch ears in place (purple line on diagram)
Stitch bow in place as desired
Assembly:
Once features and embellishments are attached join front and back of purse.
Place back and front pieces together, right side face out.
Starting at first RED check on left and working through both pieces, crochet in each stitch around outside of bag, leaving center 15 stitches at top unworked.
Attach strap by inserting, front to back through space between the first and second stitch at points. (RED DOT) Fold up about 1 ½ inches, make several stitches through folded part then tightly wrap tail around strap, insert needle under wrapped band and pull tail under the band and up into the strap. Repeat for second side of strap.
Attach button or bobble to center top on back of purse. Work in any remaining ends.
.jpg)




.jpg)
No comments:
Post a Comment