.jpg)


UPDATED

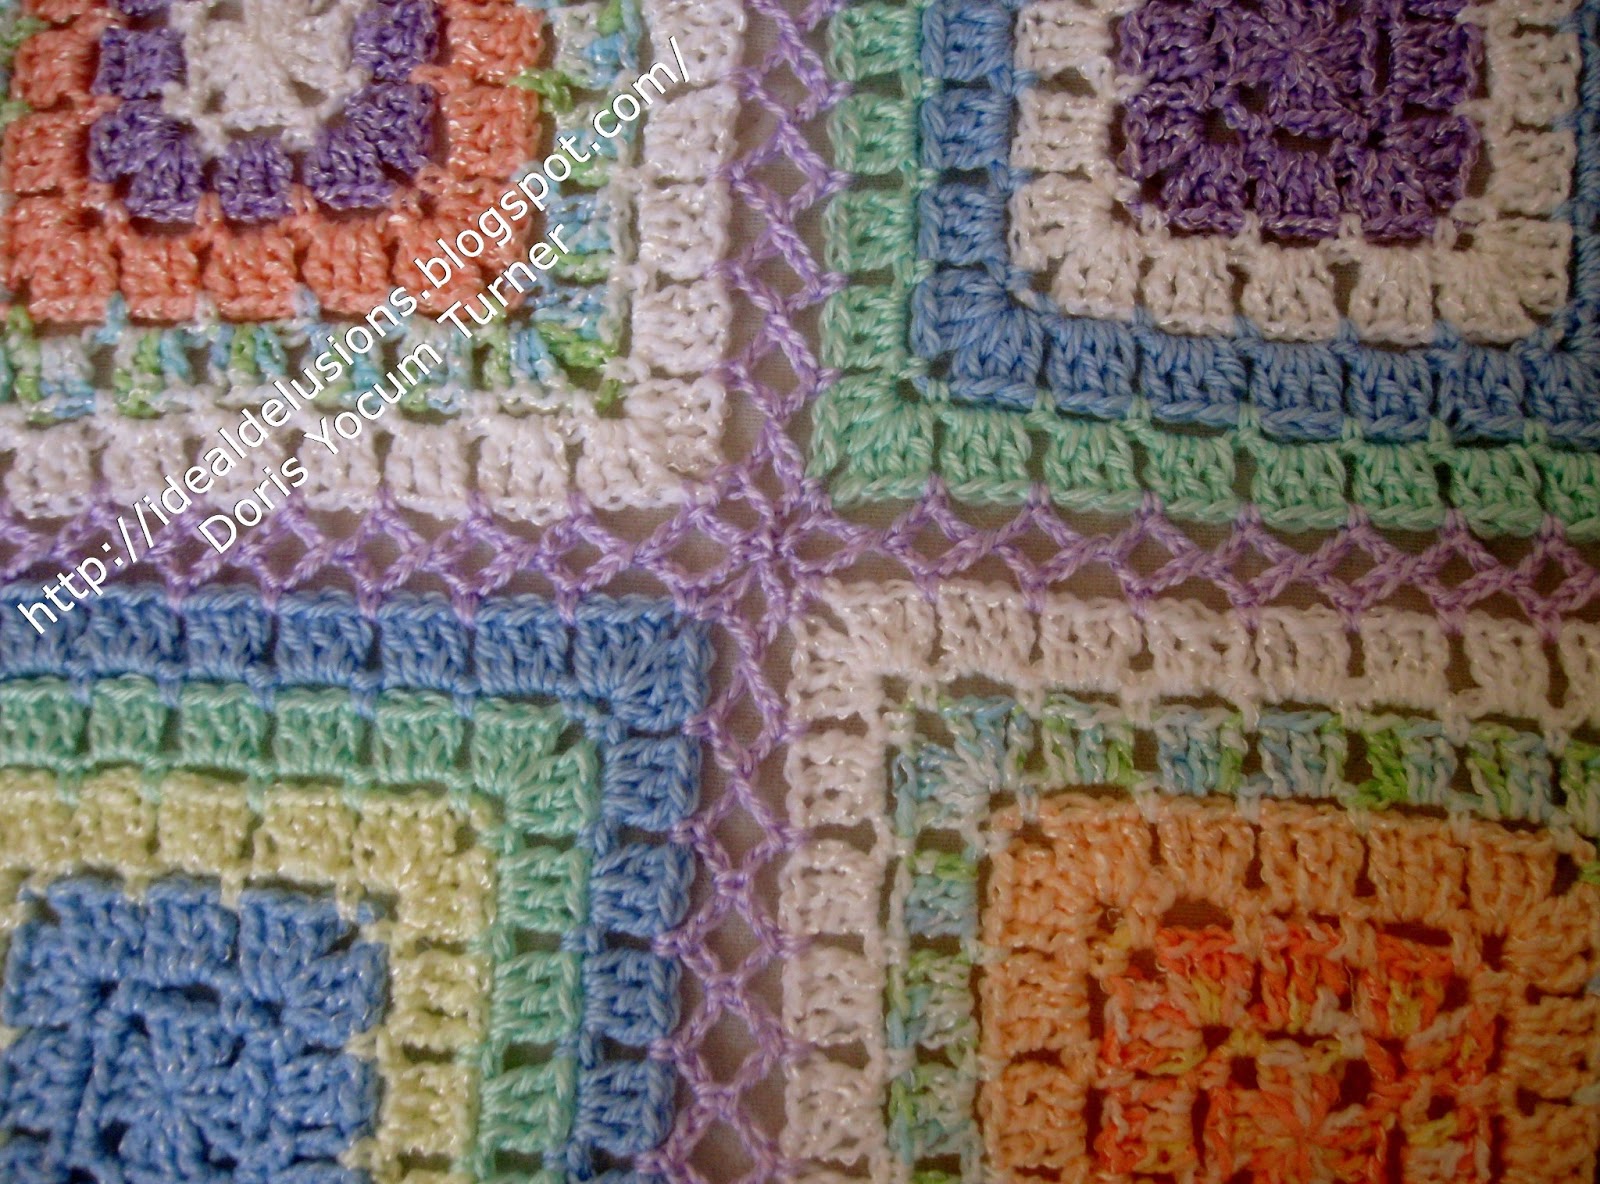
This little bit of fluff is my latest “Stash Buster”
It was made with Lion Brand, Bernat, Red Heart and Caron Baby weight Yarn
and a Susan Bates US size I-9 hook.
You may use the yarn brand and yarn weight of your choice and your choice of colors.
I do not know the exact amount of yarn needed for the squares because I created and accumulated the squares one at a time as suitable yarn became available. I would estimate 20 to 30 ounces of yarn from my stash.. If I were to buy new yarn, I would choose about 3 or 4 colors of “NO DYE LOT” yarn and buy one (5 to 7 oz) skein of each because you should easily be able to get more if you need it. This afghan only requires 20 squares.
I used Caron Simply Soft Baby yarn for the joining and border, you will need about two 6 oz skeins to complete both the joining and border.
Rnd 3. Sl st in corner loop, ch 2, 2 dc, ch 2, 3 dc, in corner, work 3 dc in each ch 3 sp between corners, in each corner loop work 3 dc, ch 2, 3 dc. around. join.
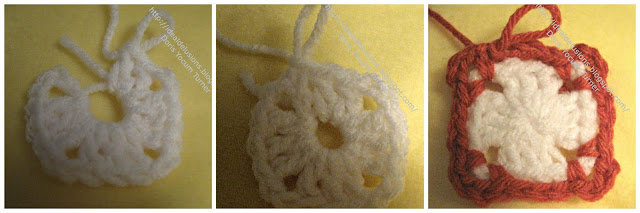
First of all, you may have noted this is not the standard granny square. It is done in an old stitch pattern I call a “block stitch" or "box stitch” and this stitch pattern probably has several more different newer names. I like this stitch because it is easy to do, and unlike the standard granny square the finished block has none of the granny square "holes", and is more flexible than the standard granny so it gives a more fluid feel or flow to the afghan.
To make the squares: Work in rounds, do not turn. Start the same as a regular granny square. You can start with your chain 4, sl st in first chain to form a ring or use the magic ring, slip ring, adjustable loop or (whatever you prefer to call it) I always start with an adjustable loop.
Rnd 1: In loop work Ch 4, 3 dc, ch 2, 3 dc, ch 2, 3 dc, ch 2, 2 dc, join to 2nd st of starting 4 ch. You should have 4 groups of 3 double crochet with a chain 2 space between each group.
Rnd 2. Color changes are always made on single crochet rounds. Sc in any 2 chain corner space, *(ch 3, sc in same corner, chain 3, sc in next corner) *repeat around ending, join with a slip stitch in the first sc.


Part 1 Continuous Join Part 2 Continuous Join
This is an “off site” link and is NOT one of mine. I cannot provide a PDF
copy. It is a written version of the continuous join, for the join as you go crowd, complete with
photos.
If you don’t wish to try the continuous join, you can join your squares using your favorite method of choice or the basic 5 chain flat braid join but I hope you will try the continuous join as it is really amazing and so much faster.
For this afghan my squares were between 7 and 7 1/2 inches square, I worked 5 rows with 4 blocks on each row. If you have used the continuous join method when you get the last square attached do not end off but continue around the outside edge of the afghan as the tutorial directs.
Border: If you used a different method to join the squares, work Round 2 of the pattern for the squares around the entire afghan so you will have the sc, chain 3 row around the outside. Continue to work in rounds.

Round 1 On right side, 3 dc in each 3 chain space, 3 dc, ch 2, 3 dc in each corner, working as for round 3 of the squares. join.
Special stitches:
“V stitch” = 1 dc, ch 1, 1 dc all in same space. (double click photo to enlarge)
Round 2 Skip 3 dc, by slip stitching to first sp between 3 dc clusters, ch 4, dc in same space, (counts as first “V” st,) work a “V” stitch between each 3 dc cluster to corner and (“V” st, chain 3, “V” st) in each corner ch 2 space, around, join to 3rd chain of beginning chain 4.
Round 3: Sl st into center of the “V” stitch, ch 4, dc in same space, (counts as first “V” st,) “V” st in center of next “V st” to corner, working ( “V” st, chain 3, “V” st ) in each corner, around, join to first “V” st.
Repeat Round 3 to make your border the width you like, always working (“V” st, ch 3, “V” st) in the center 3 chain space of each corner so it will lay flat.
This afghan border has 3 rounds of “V” stitches and 1 round of “V” st with Picot to finish.
Special Stitches: Picot stitch: Double crochet, chain 3, slip st in first chain, dc in same stitch = "V" st with picot. Tutorial "V" st with Picot

Final round: Work "V" st with picot st, in the center of each “V” st around, working (dc, picot, dc, picot, dc, picot, dc) in the center 3 chain space of each corner.


For all blankets using this stitch please see:
Dear Doris, I have looked high and low and have not yet found the instructions on How to crochet the "block stitch" or "box stitch" you refer to for your "Sweet Candy Sprinkles" afghan. I am looking forward to trying a square made this way. I would appreciate any help you could give. Sincerely, Wanda
ReplyDeletewandahillis@knpanel.com
You are right. I cannot find one either. I apologize. I do know everything old is new again but I have no idea what they call that stitch today. However, the stitch pattern is very simple and I will put up instructions on how to make the square and/or side to side. I have something I must do now so it will be posted later. I have no idea what time it is where you are but I am in EST zone and will post it with photos tonight. Thank you for your patience.
DeleteI love the stiches and the color combination, it's pretty... and thank you for sharing,
ReplyDeleteThank you
DeleteI've never done a "v stitch" before. I'm currently working on a baby blanket for my sister and am in the process of joining the blocks together which is going well but after doing some looking on the V stitch I have no idea how to do it. Yours looks different from others that I have found and with the continuous join there will be a "looped" edge around the border. HELP!!! -jeannie
ReplyDeleteI use this border on many afghans all I change is the number of rows to get the width I like. The pattern detailed instructions for how to make a “V stitch” border are on this Blog and can be found here. http://idealdelusions.blogspot.com/2013/05/wintergreen-and-lace.html
DeleteThank you! Ok so just to be incredibly sure before I start...I have my chain 5 "border" around the outside edge right now. So you would do 1 "V stitch" in each 5 chain loop?
DeleteOn the Sweet Candy Sprinkles, after I joined the last square, and I had my 5 chain loop around the outside edge, I did another round of the 3 dc clusters, then on the next round instead of the chain, I put a “V” stitch between the clusters. I did this because it was my first experience with the continuous join, I had a lot of lavender yarn and I was not sure how it was going to work out. On the Wintergreen and Lace blanket, I put one “V” stitch in each 5 chain space and worked two “V” stitches in the corners. I made a 2 chain space between the 2 corner stitches to make sure it would lay flat. In the next round that chain 2 space will be where you work your (“V” st, ch 2, “V” st) on each round to be sure your corners don’t curl. If you click on the photos of the close-up of the lace edge where it starts, the photo should enlarge on a new page, click again and it should stay quite large. I love photos, sometimes they help.
DeleteThank you for your help! I TRULY appreciate it!
DeleteThank you for your question. It may also help others. My only regret is I don't usually get to see what others make. I love to admire hand crafted items. They are an inspiration to me.
DeleteI love this pattern and the look of the finished blanket my question is how do you join the squares I have not seen that before
ReplyDeleteI only posted Sweet Candy Sprinkles to call attention to the joining method for the squares which is called the “5 Chain Continuous Join”. The continuous join is basically a 5 chain flat braid join worked in a method that allows for continuous joining of the squares without the need to end off and work in the ends after each square is attached. I had found an excellent two part tutorial on “You Tube” which clearly defines the process and I was so delighted with how fast and easy it was that if felt compelled to post the links for that process. After that I received a request for the pattern stitch for Sweet Candy Sprinkles so I posted “Box Stitch afghans”. Again I got a request for how to work the border on the Sweet Candy Sprinkles and that detail can be found on the post “Wintergreen and Lace”.
DeleteI was so delighted with the continuous join process I also created an afghan called 35 squares and again posted the links for the “You Tube tutorial”. For many years I only used the standard method of either 3 or 5 chain flat braid joining, cutting and working in the ends on each and every square. That is why I was so delighted with the continuous method. If you find the continuous join method too confusing, you can find excellent tutorial (photo) for the standard 5 chain flat braid joining such as this one http://gourmetcrochet.blogspot.com/2010/01/flat-braid-join-how-to.html and others if you do not mind the tedious process of individual join. It will give you the same appearance as the 5 chain flat braid continuous join but working with individual squares is a lot more time consuming and work.
This is a video link for the 3 chain flat braid join which is worked in a very similar method as the 5 chain flat braid join, but looks a bit different. It is also an excellent way to join square but this too requires ending off, and working in the yarn tails for each individual square. http://www.youtube.com/watch?v=ySS5-1YwD5M
do you have any written instructions for the continuous join
ReplyDeleteI am sorry but I have not seen any written instructions for the continuous join method for granny squares. Crochet Cabana has a "chart" and tutorial, for joining the granny squares on the last round, but the tutorial is a video. http://www.crochetcabana.com/html/join_jayg.html
DeleteYou can also join completed Granny Squares by working a chain around each square joining as you go. The method of attachment is not so vital as knowing the direction to work each square in order to be able to work in a continuous manner instead of cutting and working in yarn ends.
Thank you for your comment
Dorie
Dear Dorie,
ReplyDeleteWould you please email me the directions for continuous joining as I cannot access the video. Written directions work better for me anyway.
I apologize but I do not know of any site that has the continuous join written out, although several other sites also have videos. The videos can be stopped and started or you can rewind and replay as often as you like.
DeleteIf you are unable to connect to the link provided with the pattern perhaps you can use another site.
Gourmet Crochet does provide an excellent tutorial (text and photo) of the flat braid join however it is not continuous.
This method will give the same appearance of but each block will have to be added individually.
http://gourmetcrochet.blogspot.co.nz/2010/01/flat-braid-join-how-to.html
Box stitch is my new favourite stitch! I have just used it in my new tea cosy pattern and it looks lovely ... I love your blanket and the colours too... :)
ReplyDeleteI love the stitch too. I also use it for hats, scarves, sweaters, placemats etc.... It is very versatile I am sure you can think of many more things. The only thing I did not like about granny squares was sometimes I did not want all the holes. I like the smooth, fluid effect of afghans worked in this stitch. Thanks for your comment.
Delete